Follow Nirav Raval

Sunday, 12 July 2015

Configure Apache 2.4 Web Server with Tomcat 8.0 as a Balancer to run the Java Web Application

Hello Friends,
Today I am gonna show you the Apache Web Server version 2.4 to act as mediator to handle the application load by dividing it into more than one Application Servers.

Here I am using Tomcat 8 as an Application Server to run a Java Based Web application.

I have configure this in Windows 8 64 bit Operating System.

I assume that you have done the tomcat server configuration to set context outside webapps folder of it.
For that write your context name and path in server.xml file of tomcat server as below.

This must be written under <Host> tag.
<Context  docBase="G:\Deploy\SampleWeb"
          path="/
SampleWeb"
          reloadable="true" />

To do this, follow below steps.
  • Download Apache 2.x from apache site.
  • Download Apache Tomcat 8 also.
  • Install Apache web server on your system.
  • Make two copy of tomcat and  set context of web application as shown above.
  • Both tomcat must set on different port.
  • I have set one Tomcat on 8080 and second on 8081 in <Connector> port in  Server.xml file. 
  • Now open httpd file of Apache web server from conf folder and add below configuration in it.
ServerName www.nirav.com:80

<VirtualHost *:80>
    ServerName www.nirav.com
    ServerAlias nirav.com
   
   
<Proxy balancer://mycluster>
        BalancerMember http://localhost:8080/ route=tomcat1
        BalancerMember http://localhost:8081/ route=tomcat2
        ProxySet lbmethod=byrequests
    </Proxy>
    ProxyPass / balancer://mycluster/
</VirtualHost> 


_____________________________________________________________

In above configuration, I have used byrequest method for load balancing. 
This means the load of requests is balanced based on each request i.e. First request served by tomcat 1, then second will be served by tomcat 2, then third will be served by tomcat 1 and so on.

To activate this you need to un-comment below module in httpd file:
LoadModule lbmethod_byrequests_module modules/mod_lbmethod_byrequests.so

Some others modules also need to be un-comment as shown below.
  • LoadModule proxy_module modules/mod_proxy.so
  • LoadModule proxy_ajp_module modules/mod_proxy_ajp.so
  • LoadModule proxy_balancer_module modules/mod_proxy_balancer.so
  • LoadModule proxy_connect_module modules/mod_proxy_connect.so
  • LoadModule proxy_express_module modules/mod_proxy_express.so
  • LoadModule proxy_fcgi_module modules/mod_proxy_fcgi.so
  • LoadModule proxy_ftp_module modules/mod_proxy_ftp.so
  • LoadModule proxy_html_module modules/mod_proxy_html.so
  • LoadModule proxy_http_module modules/mod_proxy_http.so
  • LoadModule proxy_scgi_module modules/mod_proxy_scgi.so  

After adding above configuration in httpd file of Apache server, just restart apache server. Then start both tomcats. 

If any error shown on restart Apache server then read its log file and act accordingly.The error comes if the configuration is not properly done. Or any required module directive is not added.

I have given almost all modules to make un-comment. 


I have set domain name as www.nirav.com in my host file (C:\Windows\System32\Drivers\etc\host)   to make run in local machine. You can use what you want.


Now this done. You can run your application with activated load balancer by Apache web server.

Just need to write www.nirav.com/SampleWeb in web browser and the request will be handled by two tomcats one by one on each request.

I hope this will helpful to understand the basic configuration for enable balancer in Apache web server.

Here, I have not covered any theory part, you can google it separately.

Thank you..!

Wednesday, 24 December 2014

JQury Grouping Table Data


Hello Friends,
Today, lets make some fun with jQuery demo of grouping HTML table data.

Problem:
I have one table with many columns but one column having same data.
And other columns with data related one single column.
For e.g.
List of States. In which list of Cities or Locations.
I need to group all data State wise.

Below is our Table. We need to Group this table data based on State column.


Now, We will use jQuery for group above data based on State Column. And below will be the output.


HTML Table Code before Group:
<body>

<h3>JQury Grouping Table Data</h3>
    <table id="myTable" border="1" cellpadding="3" cellspacing="0">
        <tr>
            <th>Sr No</th>
            <th>State</th>
            <th>Location</th>
            <th>Famous Area</th>           
        </tr>
        <tr>
            <td>1</td>
            <td>Gujarat</td>
            <td>Ahmedabad</td>
            <td>AAA</td>           
        </tr>
        <tr>
            <td>2</td>
            <td>Gujarat</td>
            <td>Baroda</td>
            <td>BBB</td>           
        </tr>
        <tr>
            <td>3</td>
            <td>Gujarat</td>
            <td>Surat</td>
            <td>CCC</td>           
        </tr>
        <tr>
            <td>4</td>
            <td>Gujarat</td>
            <td>Rajkot</td>
            <td>DDD</td>           
        </tr>
        <tr>
            <td>5</td>
            <td>Maharastra</td>
            <td>Mumbai</td>
            <td>EEE</td>           
        </tr>
        <tr>
            <td>6</td>
            <td>Maharastra</td>
            <td>Nagpur</td>
            <td>FFF</td>           
        </tr>
        <tr>
            <td>7</td>
            <td>Maharastra</td>
            <td>Khandala</td>
            <td>GGG</td>           
        </tr>
        <tr>
            <td>8</td>
            <td>Madhya Pradesh</td>
            <td>Bhopal</td>
            <td>HHH</td>           
        </tr>
        <tr>
            <td>9</td>
            <td>Madhya Pradesh</td>
            <td>Rajgarh</td>
            <td>III</td>           
        </tr>
        <tr>
            <td>10</td>
            <td>Madhya Pradesh</td>
            <td>Sehore</td>
            <td>JJJ</td>           
        </tr>
        <tr>
            <td>11</td>
            <td>Madhya Pradesh</td>
            <td>Bhind</td>
            <td>KKK</td>           
        </tr>
        <tr>
            <td>12</td>
            <td>Madhya Pradesh</td>
            <td>Big</td>
            <td>120</td>           
        </tr>
    </table>

Now we will write one jQuery function and apply for above table to group it based on State name.

<script>
    $(document).ready(function() {
        $(function() {
            function groupTable($rows, startIndex, total) {
                if (total === 0) {
                    return;
                }
                var i, currentIndex = startIndex, count = 1, lst = [];
                var tds = $rows.find('td:eq(' + currentIndex + ')');
                var ctrl = $(tds[0]);
                lst.push($rows[0]);
                for (i = 1; i <= tds.length; i++) {
                    if (ctrl.text() == $(tds[i]).text()) {
                        count++;
                        $(tds[i]).addClass('deleted');
                        lst.push($rows[i]);
                    } else {
                        if (count > 1) {
                            ctrl.attr('rowspan', count);
                            groupTable($(lst), startIndex + 1, total - 1)
                        }
                        count = 1;
                        lst = [];
                        ctrl = $(tds[i]);
                        lst.push($rows[i]);
                    }
                }
            }
            groupTable($('#myTable tr:has(td)'), 1, 1);
            $('#myTable .deleted').remove();
        });
    });
</script>

Note: I have used below jQuery-2.1.3.min.js file.
<script src="http://code.jquery.com/jquery-2.1.3.min.js"></script>
______________________________________________________________________

Hope you find this helpful....!

Thursday, 1 August 2013


Spring MVC - Hibernate Demo Application


Hello Friends,

Nice to see you again.
In Previous Sessions  we have seen  Spring MVC with Annotation Demo. And learn how they work.
Today, we will see the example of  Spring MVC with Hibernate basic tutorial.

This demo I have created using Netbeans IDE 7.1.2.
Netbeans provide Spring Project with Hibernate, So no need to find out every Jars as it provides by Netbeans itself.

Ok Here we will create one Student Register Application demo which we previosuly develope without database.

Now we will extend that with adding Hibernate support to persist our data in MySQL Server.

Below is our final output.

Student Registration Demo


For create this application, I have create one Database Table "Student" in MySQL Server as below.
---------------------------------------------------------------------------------------------------------------------------
CREATE TABLE `student` (
  `id` int(11) NOT NULL AUTO_INCREMENT,
  `firstname` varchar(30) DEFAULT NULL,
  `lastname` varchar(30) DEFAULT NULL,
  `telephone` varchar(15) DEFAULT NULL,
  `email` varchar(30) DEFAULT NULL,
  `created` timestamp NOT NULL DEFAULT CURRENT_TIMESTAMP ON UPDATE CURRENT_TIMESTAMP,
  PRIMARY KEY (`id`)
) ENGINE=InnoDB AUTO_INCREMENT=4 DEFAULT CHARSET=latin1
---------------------------------------------------------------------------------------------------------------------------

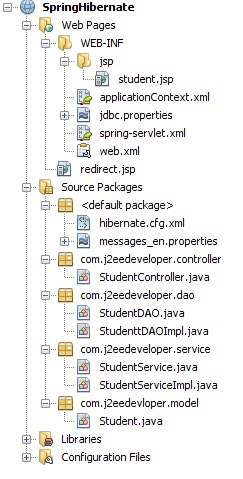
Project Structure


Source Code:
---------------------------------------------------------------------------------------------------------------------------
(1) Web.xml
---------------------------------------------------------------------------------------------------------------------------
<?xml version="1.0" encoding="UTF-8"?>
<web-app xmlns:xsi="http://www.w3.org/2001/XMLSchema-instance"
xmlns="http://java.sun.com/xml/ns/javaee"
xmlns:web="http://java.sun.com/xml/ns/javaee/web-app_2_5.xsd"
xsi:schemaLocation="http://java.sun.com/xml/ns/javaee 
        http://java.sun.com/xml/ns/javaee/web-app_2_5.xsd"
id="WebApp_ID" version="2.5">
<display-name>Spring3-Hibernate</display-name>
<welcome-file-list>
<welcome-file>index.html</welcome-file>
</welcome-file-list>
<servlet>
<servlet-name>spring</servlet-name>
<servlet-class>
org.springframework.web.servlet.DispatcherServlet
</servlet-class>
<load-on-startup>1</load-on-startup>
</servlet>
<servlet-mapping>
<servlet-name>spring</servlet-name>
<url-pattern>/</url-pattern>
</servlet-mapping>
</web-app>

---------------------------------------------------------------------------------------------------------------------------
(2) spring-servlet.xml
---------------------------------------------------------------------------------------------------------------------------
<?xml  version="1.0" encoding="UTF-8"?>
<beans xmlns="http://www.springframework.org/schema/beans"
xmlns:xsi="http://www.w3.org/2001/XMLSchema-instance"
xmlns:aop="http://www.springframework.org/schema/aop"
xmlns:context="http://www.springframework.org/schema/context"
xmlns:jee="http://www.springframework.org/schema/jee"
xmlns:lang="http://www.springframework.org/schema/lang"
xmlns:p="http://www.springframework.org/schema/p"
xmlns:tx="http://www.springframework.org/schema/tx"
xmlns:util="http://www.springframework.org/schema/util"
xsi:schemaLocation="http://www.springframework.org/schema/beans http://www.springframework.org/schema/beans/spring-beans.xsd
http://www.springframework.org/schema/aop http://www.springframework.org/schema/aop/spring-aop.xsd
http://www.springframework.org/schema/context http://www.springframework.org/schema/context/spring-context.xsd
http://www.springframework.org/schema/jee http://www.springframework.org/schema/jee/spring-jee.xsd
http://www.springframework.org/schema/lang http://www.springframework.org/schema/lang/spring-lang.xsd
http://www.springframework.org/schema/tx http://www.springframework.org/schema/tx/spring-tx.xsd
http://www.springframework.org/schema/util http://www.springframework.org/schema/util/spring-util.xsd">

<context:annotation-config />
<context:component-scan base-package="com.j2eedeveloper" />

<bean id="jspViewResolver"
class="org.springframework.web.servlet.view.InternalResourceViewResolver">
<property name="viewClass"
value="org.springframework.web.servlet.view.JstlView" />
<property name="prefix" value="/WEB-INF/jsp/" />
<property name="suffix" value=".jsp" />
</bean>

<bean id="messageSource"
class="org.springframework.context.support.ReloadableResourceBundleMessageSource">
<property name="basename" value="classpath:messages" />
<property name="defaultEncoding" value="UTF-8" />
</bean>
<bean id="propertyConfigurer"
class="org.springframework.beans.factory.config.PropertyPlaceholderConfigurer"
p:location="/WEB-INF/jdbc.properties" />

<bean id="dataSource"
class="org.apache.commons.dbcp.BasicDataSource" destroy-method="close"
p:driverClassName="${jdbc.driverClassName}"
p:url="${jdbc.databaseurl}" p:username="${jdbc.username}"
p:password="root" />

<bean id="sessionFactory"
class="org.springframework.orm.hibernate3.LocalSessionFactoryBean">
<property name="dataSource" ref="dataSource" />
<property name="configLocation">
<value>classpath:hibernate.cfg.xml</value>
</property>
<property name="configurationClass">
<value>org.hibernate.cfg.AnnotationConfiguration</value>
</property>
<property name="hibernateProperties">
<props>
<prop key="hibernate.dialect">${jdbc.dialect}</prop>
<prop key="hibernate.show_sql">true</prop>
</props>
</property>
</bean>
<tx:annotation-driven />
<bean id="transactionManager"
class="org.springframework.orm.hibernate3.HibernateTransactionManager">
<property name="sessionFactory" ref="sessionFactory" />
</bean>
</beans>

---------------------------------------------------------------------------------------------------------------------------
(3) jdbc.properties
---------------------------------------------------------------------------------------------------------------------------

jdbc.driverClassName= com.mysql.jdbc.Driver
jdbc.dialect=org.hibernate.dialect.MySQLDialect
jdbc.databaseurl=jdbc:mysql://localhost:3306/test
jdbc.username=root
jdbc.password=root

---------------------------------------------------------------------------------------------------------------------------
(4) hibernate.cfg.xml
---------------------------------------------------------------------------------------------------------------------------
<?xml version='1.0' encoding='utf-8'?>
<!DOCTYPE hibernate-configuration PUBLIC
    "-//Hibernate/Hibernate Configuration DTD//EN"
    "http://hibernate.sourceforge.net/hibernate-configuration-3.0.dtd">

<hibernate-configuration>
    <session-factory>
        <mapping class="com.j2eedevloper.model.Student" />
    </session-factory>
   
</hibernate-configuration>

---------------------------------------------------------------------------------------------------------------------------
(5) messages_en.properties
---------------------------------------------------------------------------------------------------------------------------
label.firstname=First Name
label.lastname=Last Name
label.email=Email
label.telephone=Telephone
label.addStudent=Add Student
label.title=Student Manager

label.footer=&copy; niravj2eedeveloper.blogspot.com

---------------------------------------------------------------------------------------------------------------------------
(6) StudentController.java
---------------------------------------------------------------------------------------------------------------------------
package com.j2eedeveloper.controller;

import com.j2eedeveloper.service.StudentService;
import com.j2eedevloper.model.Student;
import java.util.Map;
import org.springframework.beans.factory.annotation.Autowired;
import org.springframework.stereotype.Controller;
import org.springframework.web.bind.annotation.ModelAttribute;
import org.springframework.web.bind.annotation.PathVariable;
import org.springframework.web.bind.annotation.RequestMapping;
import org.springframework.web.bind.annotation.RequestMethod;

@Controller
public class StudentController {

    @Autowired
    private StudentService studentService;

    @RequestMapping("/index")
    public String listContacts(Map<String, Object> map) {

        map.put("student", new Student());
        map.put("studentList", studentService.listStudent());

        return "student";
    }

    @RequestMapping(value = "/add", method = RequestMethod.POST)
    public String addContact(@ModelAttribute("student") Student student) {

        studentService.addStudent(student);

        return "redirect:/index";
    }

    @RequestMapping("/delete/{studentId}")
    public String deleteContact(@PathVariable("studentId") Integer studentId) {

        studentService.removeStudent(studentId);

        return "redirect:/index";
    }

}

---------------------------------------------------------------------------------------------------------------------------
(7) StudentDAO.java
---------------------------------------------------------------------------------------------------------------------------
package com.j2eedeveloper.dao;

import com.j2eedevloper.model.Student;
import java.util.List;

public interface StudentDAO {

    public void addStudent(Student student);

    public List<Student> listStudent();

    public void removeStudent(Integer id);

}

---------------------------------------------------------------------------------------------------------------------------
(8) StudenttDAOImpl.java
---------------------------------------------------------------------------------------------------------------------------
package com.j2eedeveloper.dao;

import com.j2eedevloper.model.Student;
import java.util.List;
import org.hibernate.SessionFactory;
import org.springframework.beans.factory.annotation.Autowired;
import org.springframework.stereotype.Repository;

@Repository
public class StudenttDAOImpl implements StudentDAO {

    @Autowired
    private SessionFactory sessionFactory;

    public void addStudent(Student student) {
        sessionFactory.getCurrentSession().save(student);
    }

    public List<Student> listStudent() {

        return sessionFactory.getCurrentSession().createQuery("from Student").list();
    }

    public void removeStudent(Integer id) {
        Student student = (Student) sessionFactory.getCurrentSession().load(
                Student.class, id);
        if (null != student) {
            sessionFactory.getCurrentSession().delete(student);
        }

    }

}

---------------------------------------------------------------------------------------------------------------------------
(9) StudentService.java
---------------------------------------------------------------------------------------------------------------------------
package com.j2eedeveloper.service;

import com.j2eedevloper.model.Student;
import java.util.List;

public interface StudentService {

    public void addStudent(Student student);

    public List<Student> listStudent();

    public void removeStudent(Integer id);

}

---------------------------------------------------------------------------------------------------------------------------
(10) StudentServiceImpl.java
---------------------------------------------------------------------------------------------------------------------------
package com.j2eedeveloper.service;

import com.j2eedeveloper.dao.StudentDAO;
import com.j2eedevloper.model.Student;
import java.util.List;
import org.springframework.beans.factory.annotation.Autowired;
import org.springframework.stereotype.Service;
import org.springframework.transaction.annotation.Transactional;

@Service
public class StudentServiceImpl implements StudentService {

    @Autowired
    private StudentDAO studentDAO;

    @Transactional
    public void addStudent(Student student) {
        studentDAO.addStudent(student);
    }

    @Transactional
    public List<Student> listStudent() {

        return studentDAO.listStudent();
    }

    @Transactional
    public void removeStudent(Integer id) {
        studentDAO.removeStudent(id);
    }

}

---------------------------------------------------------------------------------------------------------------------------
(11) Student.java
---------------------------------------------------------------------------------------------------------------------------
package com.j2eedevloper.model;

import javax.persistence.*;

@Entity
@Table(name = "Student")
public class Student {

    @Id
    @Column(name = "ID")
    @GeneratedValue
    private Integer id;
    @Column(name = "FIRSTNAME")
    private String firstname;
    @Column(name = "LASTNAME")
    private String lastname;
    @Column(name = "EMAIL")
    private String email;
    @Column(name = "TELEPHONE")
    private String telephone;

    public String getEmail() {
        return email;
    }

    public String getTelephone() {
        return telephone;
    }

    public void setEmail(String email) {
        this.email = email;
    }

    public void setTelephone(String telephone) {
        this.telephone = telephone;
    }

    public String getFirstname() {
        return firstname;
    }

    public String getLastname() {
        return lastname;
    }

    public void setFirstname(String firstname) {
        this.firstname = firstname;
    }

    public void setLastname(String lastname) {
        this.lastname = lastname;
    }

    public Integer getId() {
        return id;
    }

    public void setId(Integer id) {
        this.id = id;
    }
}

---------------------------------------------------------------------------------------------------------------------------
(12) student.jsp
---------------------------------------------------------------------------------------------------------------------------

<%@taglib uri="http://www.springframework.org/tags" prefix="spring"%>
<%@taglib uri="http://www.springframework.org/tags/form" prefix="form"%>
<%@taglib uri="http://java.sun.com/jsp/jstl/core" prefix="c"%>
<html>
    <head>
        <title>Spring 3 MVC Hibernate - Student Manager</title>
        <style type="text/css">
            body {
                font-family: sans-serif;
            }
            .data, .data td {
                border-collapse: collapse;
                width: 100%;
                border: 1px solid #aaa;
                margin: 2px;
                padding: 2px;
            }
            .data th {
                font-weight: bold;
                background-color: #5C82FF;
                color: white;
            }
        </style>
    </head>
    <body>

        <h2><spring:message code="label.title"/></h2>

        <form:form method="post" action="add.html" commandName="student">

            <table>
                <tr>
                    <td><form:label path="firstname"><spring:message code="label.firstname"/></form:label></td>
                    <td><form:input path="firstname" /></td>
                </tr>
                <tr>
                    <td><form:label path="lastname"><spring:message code="label.lastname"/></form:label></td>
                    <td><form:input path="lastname" /></td>
                </tr>
                <tr>
                    <td><form:label path="email"><spring:message code="label.email"/></form:label></td>
                    <td><form:input path="email" /></td>
                </tr>
                <tr>
                    <td><form:label path="telephone"><spring:message code="label.telephone"/></form:label></td>
                    <td><form:input path="telephone" /></td>
                </tr>
                <tr>
                    <td colspan="2">
                        <input type="submit" value="<spring:message code="label.addStudent"/>"/>
                    </td>
                </tr>
            </table>
        </form:form>


        <h3>Students</h3>
        <c:if  test="${!empty studentList}">
            <table class="data">
                <tr>
                    <th style="width: 40%">Name</th>
                    <th style="width: 30%">Email</th>
                    <th style="width: 20%">Telephone</th>
                    <th>&nbsp;</th>
                </tr>
                <c:forEach items="${studentList}" var="student">
                    <tr>
                        <td style="width: 40%">${student.lastname} ${student.firstname} </td>
                        <td style="width: 30%">${student.email}</td>
                        <td style="width: 20%">${student.telephone}</td>
                        <td><a href="delete/${student.id}">delete</a></td>
                    </tr>
                </c:forEach>
            </table>
        </c:if>

        <br/>
        <hr/>
        <h3><spring:message code="label.footer"/></h3>
        <hr/>
    </body>

</html>

---------------------------------------------------------------------------------------------------------------------------
Now run URL http://localhost:8080/SpringHibernate/index  in your browser.
---------------------------------------------------------------------------------------------------------------------------
Hope you find this helpful....!

Friday, 19 July 2013

Spring MVC with Annotation

Hello Friends,

Nice to see you again.
In Previous Sessions  we have seen  Hibernate Basic Demo. And learn how they work.
Today, we will see the example of  Spring MVC with annotation basic tutorial.

This demo I have created using Netbeans IDE 7.1.2.
Netbeans provide Spring Project, So no need to find out every Jars as it provides by Netbeans itself.

Ok Here we will create one Student Register Application demo.
Where first page will have URL redirect for New Student Registration Page.
When Registration done then view registration page will call.

Ok below is the screen dump showing my project structure.

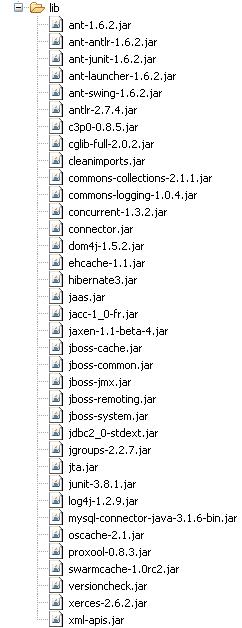
And below is the Libraries added by Netbeans for Spring Project. You choose which you want to use.


Output: 

Run http://localhost:8080/StudentSpringDemo/addStudent


1st Scrren:


2nd Screen:


3rd Screen:

Source Code:
---------------------------------------------------------------------------
(1) Web.xml
---------------------------------------------------------------------------
<?xml version="1.0" encoding="UTF-8"?>
<web-app version="3.0" xmlns="http://java.sun.com/xml/ns/javaee" xmlns:xsi="http://www.w3.org/2001/XMLSchema-instance" xsi:schemaLocation="http://java.sun.com/xml/ns/javaee http://java.sun.com/xml/ns/javaee/web-app_3_0.xsd">
    <display-name>Spring MVC Form Handling With Nirav Raval</display-name>

    <servlet>
        <servlet-name>J2eeDeveloper</servlet-name>
        <servlet-class>
            org.springframework.web.servlet.DispatcherServlet
        </servlet-class>
        <load-on-startup>1</load-on-startup>
    </servlet>

    <servlet-mapping>
        <servlet-name>J2eeDeveloper</servlet-name>
        <url-pattern>/</url-pattern>
    </servlet-mapping>
   
</web-app>

---------------------------------------------------------------------------
(2) J2eeDeveloper-servlet.xml
---------------------------------------------------------------------------
<?xml version="1.0" encoding="UTF-8"?>
<beans xmlns="http://www.springframework.org/schema/beans"
       xmlns:context="http://www.springframework.org/schema/context"
       xmlns:xsi="http://www.w3.org/2001/XMLSchema-instance"
       xsi:schemaLocation="
   http://www.springframework.org/schema/beans     
   http://www.springframework.org/schema/beans/spring-beans-3.0.xsd
   http://www.springframework.org/schema/context 
   http://www.springframework.org/schema/context/spring-context-3.0.xsd">

    <context:component-scan base-package="com.j2eedeveloper" />   
       
    <bean class="org.springframework.web.servlet.view.InternalResourceViewResolver">
        <property name="prefix" value="/WEB-INF/jsp/" />
        <property name="suffix" value=".jsp" />
    </bean>
</beans>

---------------------------------------------------------------------------
(3) StudentController.java
---------------------------------------------------------------------------
/*
 * To change this template, choose Tools | Templates
 * and open the template in the editor.
 */
package com.j2eedeveloper;

import org.springframework.stereotype.Controller;
import org.springframework.ui.ModelMap;
import org.springframework.web.bind.annotation.ModelAttribute;
import org.springframework.web.bind.annotation.RequestMapping;
import org.springframework.web.bind.annotation.RequestMethod;
import org.springframework.web.servlet.ModelAndView;
/**
 *
 * @author Nirav
 */
@Controller
public class StudentController {
 
 
    @RequestMapping(value="/index", method= RequestMethod.GET)
    public ModelAndView Startup(){
        return new ModelAndView("index");
     
    }
 
    @RequestMapping(value="/student", method= RequestMethod.GET)
    public ModelAndView Student(){
        return new ModelAndView("Student", "command", new Student());
    }
 
    @RequestMapping(value="/addStudent", method = RequestMethod.POST)
    public String addStudent(@ModelAttribute("SpringWeb")Student student, ModelMap model){
        model.addAttribute("id", student.getId());
        model.addAttribute("rollno", student.getRollno());
        model.addAttribute("age", student.getAge());
        model.addAttribute("name", student.getName());
     
        return "result";
    }
}

---------------------------------------------------------------------------
(4) index.jsp
---------------------------------------------------------------------------

<%--
    Document   : index
    Created on : July 19, 2013, 9:38:17 PM
    Author     : Nirav
--%>

<%@page contentType="text/html" pageEncoding="UTF-8"%>
<!DOCTYPE html>
<html>
    <head>
        <meta http-equiv="Content-Type" content="text/html; charset=UTF-8">
        <title>Spring MVC DemoWith Nirav</title>
    </head>
    <body>
        <h1>Spring MVC DemoWith Nirav</h1>
        <a href="/StudentSpringDemo/student/">Add Student</a>
    </body>
</html>


---------------------------------------------------------------------------
(5) Student.jsp
---------------------------------------------------------------------------

<%--
    Document   : Student
    Created on : Jun 10, 2013, 9:49:55 PM
    Author     : Nirav
--%>

<%@taglib uri="http://www.springframework.org/tags/form" prefix="form"%>
<html>
<head>
    <title>Spring MVC Form Handling With Nirav Raval</title>
</head>
<body>

<h2>Student Information</h2>
<form:form method="POST" action="/StudentSpringDemo/addStudent">
   <table>
    <tr>
        <td><form:label path="name">Name</form:label></td>
        <td><form:input path="name" /></td>
    </tr>
    <tr>
        <td><form:label path="age">Age</form:label></td>
        <td><form:input path="age" /></td>
    </tr>
    <tr>
        <td><form:label path="rollno">Roll No</form:label></td>
        <td><form:input path="rollno" /></td>
    </tr>
    <tr>
        <td><form:label path="id">id</form:label></td>
        <td><form:input path="id" /></td>
    </tr>
    <tr>
        <td colspan="2">
            <input type="submit" value="Submit"/>
        </td>
    </tr>
</table> 
</form:form>
</body>
</html>


---------------------------------------------------------------------------
(6) result.jsp
---------------------------------------------------------------------------
<%--
    Document   : result
    Created on : Jun 19, 2013, 9:51:52 PM
    Author     : Nirav
--%>

<%@taglib uri="http://www.springframework.org/tags/form" prefix="form"%>
<html>
<head>
    <title>Spring MVC Form Handling With Nirav Raval</title>
</head>
<body>

<h2>Submitted Student Information</h2>
   <table>
    <tr>
        <td>Name</td>
        <td>${name}</td>
    </tr>
    <tr>
        <td>Age</td>
        <td>${age}</td>
    </tr>
    <tr>
        <td>Roll No</td>
        <td>${rollno}</td>
    </tr>
    <tr>
        <td>ID</td>
        <td>${id}</td>
    </tr>
</table> 
</body>
</html>

---------------------------------------------------------------------------
 
Now run URL http://localhost:8080/StudentSpringDemo/addStudent  in your browser.
 
Hope you find this helpful....!

Tuesday, 10 July 2012

Basic Hibernate Tutorial

Hello Friends,

Nice to see you again.
In Previous Sessions  we have seen  Java Spring Basic Demo. And learn how they work.
Today, we will see the example of  Hibernate basic tutorial in Java Swing..

So be ready to learn this simple exmaple of Basic Hibernate Tutorail in Swing Based Application..
After apply this code in action, you will be capable of using Hibernate in your Swing Applications.

What is Hibernate..?
Hibernate is a Java Based Powerful  tool to implement databse access and operation in Java based Project (either window based or web based).
It gives capacity to access any database with simple Java Object.
Hibernate uses basic Java Object concept and access columns of Database table as an Object.

Hibernate works on POJO (Plain Old Java Object) concept.


Required JAR files to enable Hibernate functionality as shown below:
Add these jar files in your eclipse project under lib folder.


To use hibernate in your project follow below steps.

1) First create hibernate.cfg.xml file.  As shown below.
This is the hibernate configeration file which includes database connection details.
For ex, databse driver registration, name of databse to be connect etc.

----------------------------------------------------------------------------------------------------------------------------------


<?xml version='1.0' encoding='utf-8'?>
<!DOCTYPE hibernate-configuration PUBLIC
"-//Hibernate/Hibernate Configuration DTD//EN"
"http://hibernate.sourceforge.net/hibernate-configuration-3.0.dtd">

<hibernate-configuration>
<session-factory>
      <property name="hibernate.connection.driver_class">com.mysql.jdbc.Driver</property>
      <property name="hibernate.connection.url">jdbc:mysql://localhost/hibernatedatabase</property>
      <property name="hibernate.connection.username">root</property>
      <property name="hibernate.connection.password">root</property>
      <property name="hibernate.connection.pool_size">10</property>
      <property name="show_sql">true</property>
      <property name="dialect">org.hibernate.dialect.MySQLDialect</property>
      <property name="hibernate.hbm2ddl.auto">update</property>
      <!-- Mapping files -->
      <mapping resource="contact.hbm.xml"/>
</session-factory>
</hibernate-configuration>

----------------------------------------------------------------------------------------------------------------------------------


2) Then create database mapping file for ex. xyz.hbm.xml file As shown below   "contact.hbm.xml".
This file is used to map the database Table column to the Java Object.
This gives power to developer to work with database table as it is a Java Object.


----------------------------------------------------------------------------------------------------------------------------------

<?xml version="1.0"?>
<!DOCTYPE hibernate-mapping PUBLIC 
    "-//Hibernate/Hibernate Mapping DTD 3.0//EN"
    "http://hibernate.sourceforge.net/hibernate-mapping-3.0.dtd">
<hibernate-mapping>
  <class name="com.mapping.data.Contact" table="CONTACT">
    <id name="id" type="long" column="ID" >
    <generator class="assigned"/>
   </id>

   <property name="firstName">
   <column name="FIRSTNAME" />
   </property>
   <property name="lastName">
  <column name="LASTNAME"/>
   </property>
   <property name="email">
  <column name="EMAIL"/>
   </property>
   </class>

 </hibernate-mapping>


----------------------------------------------------------------------------------------------------------------------------------


3) Then create a getter - setter Java Class which will set and get values for insert in or retrive from Database Table.

Create "Contact.java" class as shown below.
----------------------------------------------------------------------------------------------------------------------------------


package com.mapping.data;
/**
 * @author Nirav Raval
 *
 * http://www.niravjavadeveloper.blogspot.com
 * Java Class to map to the database Contact Table
 */

public class Contact {
 private String firstName;
 private String lastName;
 private String email;
 private long id;

 /**
  * @return Email
  */
 public String getEmail() {
  return email;
 }

 /**
  * @return First Name
  */
 public String getFirstName() {
  return firstName;
 }

 /** 
  * @return Last name
  */
 public String getLastName() {
  return lastName;
 }

 /**
  * @param string Sets the Email
  */
 public void setEmail(String string) {
  email = string;
  System.out.println("SetEmail = "+email);
 }

 /**
  * @param string Sets the First Name
  */
 public void setFirstName(String string) {
  firstName = string;
 }

 /**
  * @param string sets the Last Name
  */
 public void setLastName(String string) {
  lastName = string;
 }

 /**
  * @return ID Returns ID
  */
 public long getId() {
  return id;
 }

 /**
  * @param l Sets the ID
  */
 public void setId(long l) {
  id = l;
 }

}

---------------------------------------------------------------------------------


4) Finally create main Java class which will use the above files to access database tables.
This main class have one hibenate  Session  which will use the hibernate config file to do the remaining works.
Create class "GUI.java" as shown below.
------------------------------------------------------------------------------------------------------------


package com.gui.adddata;

import java.awt.BorderLayout;
import java.awt.Dimension;
import java.awt.GridBagConstraints;
import java.awt.GridBagLayout;
import java.awt.Insets;
import java.awt.Toolkit;
import java.awt.event.ActionEvent;
import java.awt.event.ActionListener;
import java.util.Vector;
import javax.swing.JButton;
import javax.swing.JFrame;
import javax.swing.JLabel;
import javax.swing.JOptionPane;
import javax.swing.JPanel;
import javax.swing.JTextField;

import org.hibernate.Session;
import org.hibernate.SessionFactory;
import org.hibernate.Transaction;
import org.hibernate.cfg.Configuration;

import com.mapping.data.Contact;

/**
 * 
 * @author Nirav Raval
 * Main class use to insert data in MySQL Table Contact.
 *
 */
public class GUI extends JFrame{

 private static Dimension lbSize=new Dimension(100, 30);
 private static Dimension jtSize=new Dimension(150, 25);
 
 private static long tid = 0;
 private static String fname = null;
 private static String lname = null;
 private static String email = null;
 
 static Session session = null;
 private static Vector<Long> value=new Vector<Long>();
 
 public GUI()
 {
  setTitle("Enter Data");
  JPanel panel=new JPanel();
  panel.setLayout(new GridBagLayout());
  GridBagConstraints cn=new GridBagConstraints();
  cn.insets=new Insets(5,5,5,5);
  
  cn.gridx=0;
  cn.gridy=0;
  JLabel lbID=new JLabel("ID");
  lbID.setPreferredSize(lbSize);
  panel.add(lbID,cn);
  
  cn.gridx=1;
  cn.gridy=0;
  final JTextField jtID=new JTextField();
  jtID.setPreferredSize(jtSize);
  panel.add(jtID,cn);
  
  cn.gridx=0;
  cn.gridy=1;
  JLabel lbName=new JLabel("First Name");
  lbName.setPreferredSize(lbSize);
  panel.add(lbName,cn);
  
  cn.gridx=1;
  cn.gridy=1;
  final JTextField jtName=new JTextField();
  jtName.setPreferredSize(jtSize);
  panel.add(jtName,cn);
  
  cn.gridx=0;
  cn.gridy=2;
  JLabel lbLastName=new JLabel("Last Name");
  lbLastName.setPreferredSize(lbSize);
  panel.add(lbLastName,cn);
  
  cn.gridx=1;
  cn.gridy=2;
  final JTextField jtLastName=new JTextField();
  jtLastName.setPreferredSize(jtSize);
  panel.add(jtLastName,cn);
  
  cn.gridx=0;
  cn.gridy=3;
  JLabel lbEmail=new JLabel("Email");
  lbEmail.setPreferredSize(lbSize);
  panel.add(lbEmail,cn);
  
  cn.gridx=1;
  cn.gridy=3;
  final JTextField jtEmail=new JTextField();
  jtEmail.setPreferredSize(jtSize);
  panel.add(jtEmail,cn);
  
  cn.gridwidth=2;
  cn.gridx=0;
  cn.gridy=4;
  JButton jbInsert=new JButton("Insert");
  panel.add(jbInsert,cn);
  
  getContentPane().add(panel,BorderLayout.NORTH);
  
  
  pack();
  
  Dimension screen = Toolkit.getDefaultToolkit().getScreenSize();
  // Center horizontally.
  int X = (screen.width / 2) - (this.getWidth()/ 2); 
  // Center vertically.
  int Y = (screen.height / 2) - (this.getHeight() / 2); 
  
  //Set Frame in Center of the screen
  this.setBounds(X,Y , this.getWidth(),this.getHeight());
  
  setVisible(true);
  setResizable(false);
  setDefaultCloseOperation(JFrame.EXIT_ON_CLOSE);
  
  // Button ActionEvent
  
  jbInsert.addActionListener(new ActionListener() {
   
   @Override
   public void actionPerformed(ActionEvent arg0) {
    // TODO Auto-generated method stub
    tid = Integer.valueOf(jtID.getText());
    fname = jtName.getText();
    lname = jtLastName.getText();
    email = jtEmail.getText();
    int flag=0;
    
    //this class is used to check the id field in Contact table
    //of MySQL database.
    GetId gid=new GetId();
    
    value=gid.fetchId();
    
    for(int i=0;i<value.size();i++)
    {
     if(value.elementAt(i)==tid)
     {
      JOptionPane.showMessageDialog(null, 
        "Id Already Exist","Error",
        JOptionPane.ERROR_MESSAGE);
      flag=1;
     }
    }
    
    if(flag==0)
    {
     setData();
    }
    jtID.setText(null);
    jtName.setText(null);
    jtLastName.setText(null);
    jtEmail.setText(null);
    jtID.grabFocus();
   }
  });
 
  
 }
 
 /**
  * This method is used to insert data in MySQL Table
  * with the help of Hibernate Session.
  */
 private static void setData()
 {
  try{
   // This step will read hibernate.cfg.xml and 
   //      prepare hibernate for use
   SessionFactory sessionFactory = new 
   Configuration().configure().buildSessionFactory();
   session =sessionFactory.openSession();
   Transaction tx = session.beginTransaction();
   
    //Create new instance of Contact and set values in 
    // it by reading them from form object
     System.out.println("Inserting Record");
    Contact contact = new Contact();
    contact.setId(tid);
    contact.setFirstName(fname);
    contact.setLastName(lname);
    contact.setEmail(email);
    
    session.save(contact);
    tx.commit();
    JOptionPane.showMessageDialog(null,
      "Data inserted successfully!", 
      "Done",JOptionPane.INFORMATION_MESSAGE);
    
  }catch(Exception e){
  
   JOptionPane.showMessageDialog(null,e.getMessage(), 
     "Error",JOptionPane.ERROR_MESSAGE);
  }finally{
   // Actual contact insertion will happen at this step
   session.flush();
   session.close();

  }
 }


 public static void main(String s[])
 {
  new GUI();
 }
}


------------------------------------------------------------------------------------------------------------

5)   Now we have to create class "GetId.java" as shown below.
        This class is used to check the ID in database.
        So duplicate value can be avoided.

------------------------------------------------------------------------------------------------------------


package com.gui.adddata;

import java.util.Iterator;
import java.util.Vector;

import org.hibernate.Query;
import org.hibernate.SessionFactory;

import org.hibernate.cfg.Configuration;
import org.hibernate.classic.Session;


public class GetId {
 private static Session session=null;
 
 public Vector<Long> fetchId()
 {
  Vector<Long> vID=new Vector<Long>();
  try{
   
   // This step will read hibernate.cfg.xml and 
   // prepare hibernate for use
   SessionFactory sessionFactory = new 
    Configuration().configure().buildSessionFactory();
   session =sessionFactory.openSession();
    
   // This step will read hibernate.cfg.xml and 
   // prepare hibernate for use
   String SQL_QUERY ="Select contact.id from Contact contact";
    Query query = session.createQuery(SQL_QUERY);
    
    for(Iterator<Long> it=query.iterate();it.hasNext();){
     vID.add(it.next());
    }
    
  }catch(Exception e){
   System.out.println(e.getMessage());
  }finally{
   session.flush();
   session.close();
  }
  
  return vID;
 }
 
}


------------------------------------------------------------------------------------------------------------

OK. Now you have to run GUI.java class to check the result..


Just see the project folder how it looks like in eclipse as shown below.


Note: Before Run the class make sure you create one database called "hibernatedatabase"
           in MySQl Database as shown below.


After run the class first you get following window to accept values from user.


After entering values as shown above, click Insert data will be added in database table and following message will be generated.


Now you can check in MySQL that the record is added as shown below.


So I hope this code is helpful in understanding the working of Hibernate in JAVA.


Feel free to ask me if you have any dought regarding this.
You can also give me suggessions to improve this tutorial.


Leave comments if you like this post...!

Thank you.
Nirav Raval